
Complete guide
Three steps, in order: set up your computer, access your repository and install CloudIA. Each one first tells you what to check and only then what to install. The index on the right takes you to any point.
Step 1 · Set up your computer
Section titled “Step 1 · Set up your computer”First you check whether you already have each piece, and you only install what is missing. You do not need to know how to program: you will copy short commands and click through normal installers. If you have never used a terminal, the reference guide explains how to open one and how to tell whether a check went well.
Authenticator app
Section titled “Authenticator app”The platform, when you sign in, and CloudIA, on its first connection, will ask you for a six-digit code generated by an authenticator app on your phone: you cannot get started without it. If your organisation already uses one, that is the one to use. If you have none, either of these two will do — install it on your phone from its official store:
| App | iPhone | Android |
|---|---|---|
 Google Authenticator · Google |
App Store | Google Play |
 Microsoft Authenticator · Microsoft |
App Store | Google Play |
An authenticator app is a phone app that generates one-time codes of six digits that change every few seconds. It is the second factor of your sign-in: besides your password, you prove you have your phone. So even if someone got your password, they could not get in without that code. It works offline and sends no SMS: the app computes the code by itself.
Installing it is enough: you do not have to set anything up yet. When the platform asks you to turn on the second factor, you will scan a code with it.
Choose your AI client
Section titled “Choose your AI client”It is the program, installed on your computer, from which you will talk to CloudIA. One is enough. An assistant you use inside the browser will not do: it has to be able to connect to your organisation’s connectors, and only the ones on this list can.
Use the client your organisation has chosen. If you are not sure which one it is, ask the person in charge in your organisation. If none has been set, you can use any of these four options:
Claude Desktop Recommended
Desktop application. It is the one we recommend: it leaves the fewest steps afterwards and is the most comfortable if you do not usually work in the terminal. It installs like any other application and needs nothing else — neither Node.js nor development tools.
-
Download it from claude.com/download. The page detects your system and offers you the right download.
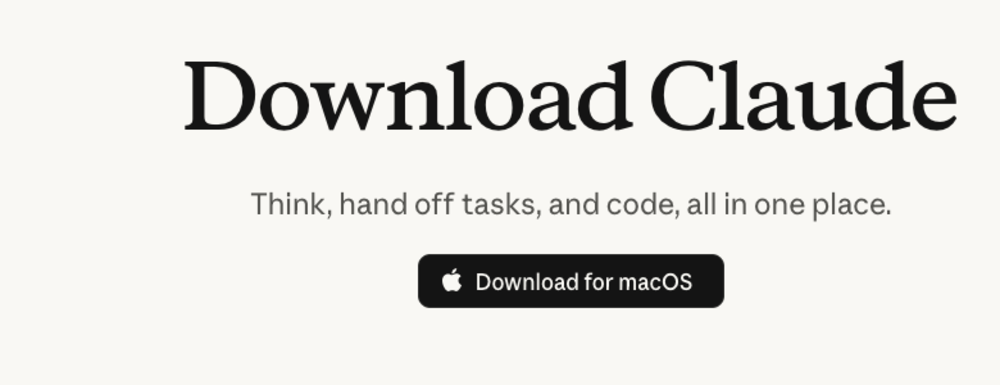
This is the download page. The button changes depending on the system you visit it from. -
Install it. On macOS, open the file and drag Claude to the Applications folder. On Windows, run the installer and accept the default options.
-
Open it and sign in with the Claude account your organisation has given you, with a corporate licence (Team or Enterprise). Personal accounts are not allowed: work with CloudIA stays under your organisation’s plan, with its terms and its control.
Claude Code
Anthropic’s terminal client. You talk to CloudIA from the terminal, inside your repository’s folder. It is the natural option if you already work in the terminal. The official installer is self-contained: it does not need Node.js or anything else, and it updates itself.
Open a terminal and paste this command:
curl -fsSL https://claude.ai/install.sh | bashWhen it finishes, close the terminal and open a new one.
Open PowerShell and paste this command:
irm https://claude.ai/install.ps1 | iexWhen it finishes, close PowerShell and open a new window. It is worth having Git for Windows installed (you check it further down, under «git») so that Claude Code can run commands on your computer.
Check that it answers, in a new terminal:
claude --versionThe first time you open it, type claude in your repository’s folder: the browser will open to sign in with the Claude account your organisation has given you, with a corporate licence (Team or Enterprise). Personal accounts are not allowed.
For other ways to install it (Homebrew, WinGet, Linux) and for troubleshooting, see the official Claude Code guide.
Leave it installed. In step 3 you will connect it to your organisation.GitHub Copilot
GitHub Copilot desktop application. It is the equivalent of Claude Desktop within GitHub: an application that installs like any other and from which you work with agents without going through the terminal. It is available for macOS, Windows and Linux. Your organisation must have an active GitHub Copilot licence, and you need a GitHub account with your corporate email.
-
Download it from github.com/features/copilot. The «Download» button offers the version for your system; if it is not yours, open «Other download options».
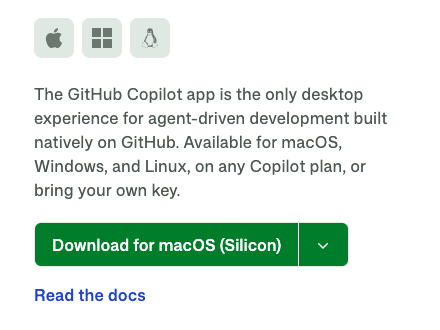
This is the application page (shown in Spanish). The button changes depending on the system you visit it from. -
Install it. On macOS, open the file and drag the application to the Applications folder. On Windows, run the installer and accept the default options.
-
Open it and sign in to GitHub with the account your organisation has given you, with a Copilot Business or Enterprise licence. Personal accounts are not allowed: with them you will not see your organisation’s connectors.
If you already work in Visual Studio Code, Copilot also works inside the editor with the GitHub Copilot extension. For this guide the desktop application is enough.
Leave it installed. In step 3 you will connect it to your organisation.Copilot CLI
GitHub Copilot’s terminal client. You talk to CloudIA from the terminal, inside your repository’s folder. The official installers are self-contained: they do not need Node.js. Besides the licence, your organisation must have Copilot CLI enabled in its Copilot settings; if it tells you it is not available when you sign in, that is why.
Open a terminal and paste this command:
curl -fsSL https://gh.io/copilot-install | bashWhen it finishes, close the terminal and open a new one.
Copilot CLI needs PowerShell 7 (its documentation requires version 6 or later). The PowerShell that comes with Windows is 5.1 and will not do. Check which one you have:
$PSVersionTable.PSVersionIf the first number is lower than 6, install PowerShell 7 with this command and, when it finishes, open a new «PowerShell 7» window from the Start menu (not «Windows PowerShell»):
winget install --id Microsoft.PowerShell --source wingetOnce in PowerShell 7, install Copilot CLI:
winget install GitHub.CopilotWhen it finishes, close the window and open a new one.
Check that it answers, in a new terminal:
copilot --versionThe first time, type copilot in your repository’s folder and, when asked, the command /login: it will guide you to sign in to GitHub with the account your organisation has given you, with a Copilot Business or Enterprise licence. Personal accounts are not allowed.
For other ways to install it (Homebrew, npm) and for troubleshooting, see the official Copilot CLI guide.
Leave it installed. In step 3 you will connect it to your organisation.Step 2 · Access your repository
Section titled “Step 2 · Access your repository”Work with CloudIA is done on a folder on your computer that is a copy of a repository of your organisation. Here you see why, ask for the access that applies to you and bring that copy to your computer.
Ask for access and clone it
Section titled “Ask for access and clone it”With the addresses at hand, clone each repository on your computer: one folder is created per repository, and that folder is what CloudIA works on. If you already know how to clone repositories, do it as usual and go to step 3. If not, the next block takes you by the hand.
Why a repository
A repository is a shared folder with history, hosted on GitHub, of which every person on the team has a copy on their computer. For CloudIA it is the project’s shared knowledge base: it holds the instructions the assistant reads when it starts, the skills and agents your organisation has prepared, and the configuration of the connectors it works with. When someone improves something, the whole team receives it with the next update; and what you learn with CloudIA can be saved there for the others. That is why you will always open your AI client inside that folder, whether you work from the desktop application or from the terminal.
It does not have to be just one. Each project has its repository, with its connectors and its knowledge, and depending on your role in the organisation you will have access to one or several. The usual thing is to start with one and add others as you take part in more projects.
Not sure whether you have git, or how to clone?
Section titled “Not sure whether you have git, or how to clone?”You need two tools, git and the GitHub CLI, then to sign in, choose a folder and clone. There are five points and they go in order: finish each one before moving to the next. All of them are done from a terminal (how to open one). If you are unsure how to read the result of a check, see how to tell whether it went well.
1. Check that you have git
Section titled “1. Check that you have git”It is the program that brings the repository to your computer. Paste this command in the terminal and press Enter:
git --versionA version number comes out, such as git version 2.46.2: you already have it, go to point 2.
It is not found: how to install it
This command installs git and Python at the same time, so you solve two pieces in one:
xcode-select --installA system window opens asking for confirmation: click Install and accept. It takes several minutes and gives no signs meanwhile, that is normal.
- Go to git-scm.com/downloads/win and click the first download link, «Click here to download».
- Open the downloaded file. If Windows asks whether you allow the app to make changes, click Yes.
- The installer asks many questions: click Next on all of them, without changing anything, and at the end Install and Finish.
When you have it, go on to point 2: Check that you have the GitHub CLI.
2. Check that you have the GitHub CLI
Section titled “2. Check that you have the GitHub CLI”It is called gh and it is what downloads the repository with your account. Check it the same way:
gh --versionA version number comes out: you already have it, go to point 3.
It is not found: how to install it
-
If you use Homebrew, the program manager for macOS, this command is enough:
Ventana de terminal brew install ghIf you do not know what Homebrew is, you do not need it: go on with point 2.
-
Go to the page of the latest GitHub CLI release, scroll down to Assets and download the file ending in
_macOS_universal.pkg. -
Open the downloaded file and follow the installer by clicking Continue and Install. It will ask for your Mac’s password: the one you use to sign in to the computer.
- Go to the page of the latest GitHub CLI release, scroll down to Assets and download the file ending in
_windows_amd64.msi. - Open it. If Windows asks whether you allow the app to make changes, click Yes, and follow the installer with Next until Finish.
When you have it, go on to point 3: Sign in to GitHub.
3. Sign in to GitHub
Section titled “3. Sign in to GitHub”Sign in with your organisation’s GitHub account, not a personal one.
gh auth login --hostname github.com --git-protocol https --webHow it goes: what you will see in the terminal and in the browser
First, in the terminal:
-
«Authenticate Git with your GitHub credentials? (Y/n)»: type Y and press Enter.
-
«First copy your one-time code: XXXX-XXXX»: the code appears in the terminal itself, on that same line, after the colon. It does not arrive by email or to your phone. It is 8 characters separated by a hyphen: keep them in view, you will type them in the browser. For example, with a made-up code:
! First copy your one-time code: 1A2B-3C4DPress Enter to open https://github.com/login/device in your browser... -
«Press Enter to open https://github.com/login/device in your browser»: press Enter. The browser opens.
Then, in the browser:
- If it asks you to sign in to GitHub, do it with your organisation’s account.
- «Device Activation» page: type the 8-character code the terminal gave you in the boxes, exactly as shown, and click Continue. If you do not see this page, open github.com/login/device yourself.
- First authorisation, «Authorize GitHub CLI»: click the green Authorize github button. It lets the tool use your account.
- Second authorisation, if your organisation requires it: a page with your organisation’s name asking to authorise access to its repositories. Click Authorize or Continue next to your organisation. Without this second one, the download will fail even though you have signed in.
- You will see «Congratulations, you’re all set!». Go back to the terminal: it will say «Logged in as YOUR-USERNAME».
To know whether you have signed in, use this command:
gh auth statusIf it went well, you will see in its answer:
- «Logged in to github.com account YOUR-USERNAME», where YOUR-USERNAME is your organisation’s account.
- «Active account: true» under that account.
If another account appears, or it answers «You are not logged into any GitHub hosts», sign out of GitHub in the browser and repeat the sign-in.
When you have it, go on to point 4: Choose your working folder.
4. Choose your working folder
Section titled “4. Choose your working folder”Do it before cloning: the repository is downloaded inside the folder the terminal is in. Create a folder for your projects, outside any folder that syncs with the cloud, and open the terminal inside it:
- Open Finder and go to the folder where you want to create the project. Remember: outside any folder that syncs with the cloud, such as iCloud Drive, which on many computers includes the Desktop and Documents. Your home folder, the one with your name, is a good place: it opens with Shift + Cmd + H.
- Right-click an empty space, choose New Folder and give it a name you will remember. We suggest CloudIA, but you can call it whatever you like.
- Open the terminal inside it, in one of these two ways:
- In the terminal, type
cdfollowed by a space. Then drag the folder you created from Finder to the terminal window and press Enter. - Or right-click the folder and choose Services and then New Terminal at Folder. If that option does not appear, use the previous way.
- In the terminal, type
- Open File Explorer and go to the folder where you want to create the project. Remember: outside any folder that syncs with the cloud, such as OneDrive, which on many computers includes the Desktop and Documents.
- Right-click an empty space, choose New and then Folder, and give it a name you will remember. We suggest CloudIA, but you can call it whatever you like.
- Open the terminal inside it, in one of these two ways:
- Right-click the folder and choose Open in Terminal. On Windows 10, hold Shift while right-clicking and choose Open PowerShell window here.
- Or in the terminal, type
cdfollowed by a space. Then drag the folder you created from File Explorer to the terminal window and press Enter.
To check that the terminal is in the right folder, make sure the name of your folder appears on the line where you type, just before the cursor.
Why this folder and not another one
The repository’s folder will be your working folder: the one you will always open with your AI assistant and where CloudIA will be installed in step 3. Do not use folders that sync with the cloud, such as the Desktop or Documents with iCloud, or OneDrive: your CloudIA key will be saved in it and would be uploaded to the cloud.
When you have it, go on to point 5: Clone the repository.
5. Clone the repository
Section titled “5. Clone the repository”Use the terminal open in the folder from point 4. If you closed it, open it again in that folder as you did there.
On macOS there is nothing to prepare: go on to point 1.
Before cloning, type this command and press Enter. It allows long file names, which some repositories have: without it the download ends with Filename too long errors and the copy is left incomplete. You do not need to be an administrator, and it is done only once on the computer.
git config --global core.longpaths true-
On GitHub, click Code, choose the GitHub CLI tab and copy the command. Paste it in the terminal and press Enter. A folder with the repository’s name is created.
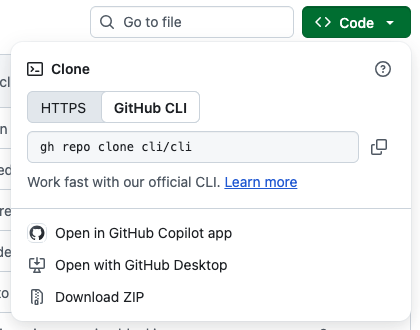
Example with a public repository: Code button, GitHub CLI tab and copy button. -
Go into that folder: type
cdfollowed by a space, drag the new folder to the terminal window and press Enter.
That folder is your working folder. You will use it in step 3 and every time you open your AI assistant.
How it goes, step by step
- Open in the browser the repository address your organisation gave you.
- Click the green Code button, at the top right of the file list.
- Choose the GitHub CLI tab and click the copy button to the right of the command.
- Paste it in the terminal, which is still in the folder you created in point 4, and press Enter. It will be something like
gh repo clone ORGANISATION/REPOSITORY-NAME. - Go into the folder that has just been created: type
cdfollowed by a space, drag the new folder to the terminal and press Enter. Its name is the last part of the command, what comes after the slash.
If the clone is rejected, access has not been granted yet, the organisation’s second authorisation is missing, or you signed in with another account: check gh auth status and, if everything looks right, ask the person in charge to review the access instead of insisting.
If on Windows the download ends with Filename too long or unable to checkout working tree, the repository has been downloaded but the copy is incomplete. There is no need to clone it again: go into its folder (point 5), run the command from before cloning and then this one, which recovers the missing files:
git restore --source=HEAD :/Check that it worked with git status: no file should appear as deleted (deleted). If you had cloned it again into another folder, keep only one copy.
Done: you now have your working folder with the repository inside. Go to step 3, Install CloudIA.
Step 3 · Install CloudIA on your computer
Section titled “Step 3 · Install CloudIA on your computer”A single command, run inside the repository’s folder, leaves your AI client connected to your organisation’s connectors. It will ask for the platform, your email and the code from your authenticator app; it does the rest.
There are five points and they go in order: finish each one before moving to the next. All of them are done from a terminal (how to open one).
1. Open the terminal in your working folder
Section titled “1. Open the terminal in your working folder”It is the repository’s folder you cloned in step 2. If the terminal from step 2 is still open in it, you are there: go to point 2. If not, type cd followed by a space, drag the repository’s folder from Finder or File Explorer to the terminal window and press Enter. Check that its name appears on the line where you type, just before the cursor.
When you have it, go on to point 2: Run the installer.
2. Run the installer
Section titled “2. Run the installer”First, check that you have Python 3. The installer needs it:
python3 --versionA version number comes out: you have it. Now copy this command, replace YOUR-PLATFORM with your organisation’s identifier, paste it in the terminal and press Enter:
curl -fsSL https://cloudframework.io/cloudia/install.sh | bash -s -- --platform YOUR-PLATFORMPython is not found: how to install it
Install it with this command. A system window opens asking for confirmation: accept it. It takes several minutes without giving signs, that is normal. When it finishes, close the terminal, open another one in your working folder and check again.
xcode-select --installCopy this command, paste it in the terminal and press Enter:
irm https://cloudframework.io/cloudia/install.ps1 | iexWhat this command does
It downloads CloudIA’s official installer and runs it in that folder, on macOS already with your platform set. You do not need to be an administrator or install anything else; on Windows you do not have to change the script execution policy either. On Windows the command cannot carry the platform, so the installer will ask for it.
If you have several repositories, repeat it in each folder: each one is configured separately.
When you have it, go on to point 3: Answer what it asks.
3. Answer what it asks
Section titled “3. Answer what it asks”Just three things:
| What it asks | What to answer |
|---|---|
| Platform («Tu plataforma») your organisation’s identifier in CloudIA |
Your organisation gives it to you. On macOS the command above already carries it. On Windows it will ask for it: type it as is. |
| Email («Tu email») your user on the platform |
The corporate email you sign in to the platform with. |
| 6-digit code identity check |
You will find it in your authenticator app (step 1). It changes every 30 seconds: type it right when it is asked for. You will never be asked for your password. |
The 6-digit code comes from your authenticator app, whether it is Google Authenticator, Microsoft Authenticator or another one: the installer names Google’s only as an example. While you type it you will see asterisks.
Then it offers the tokens you already have, or to create a new one with the letter N. A token is your personal key for the connectors; if you do not know which one to choose, create a new one.
What you will see in the terminal, screen by screen
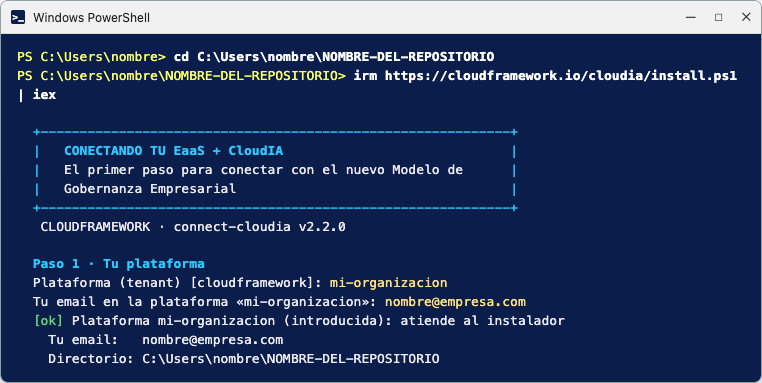
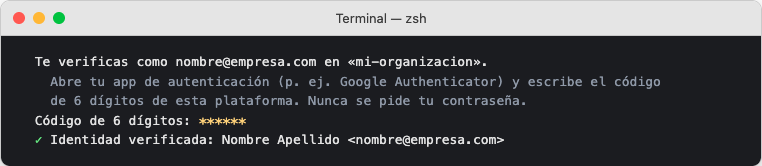
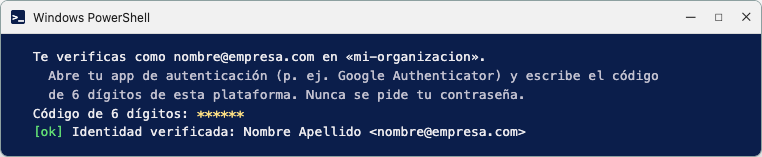
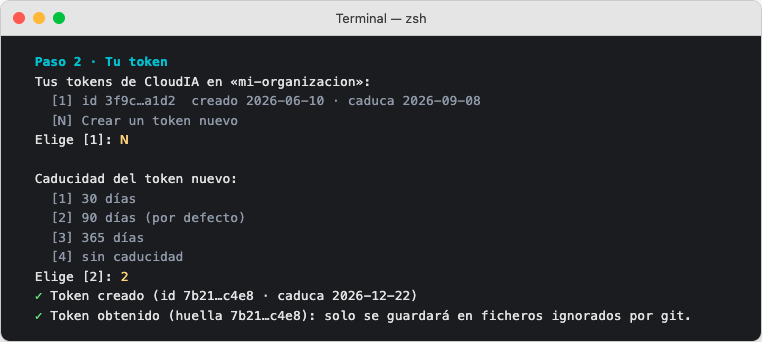
These are examples recreated with the real messages of version 2.2.0 of the installer, in Spanish, with made-up data.
Your platform and your email («Paso 1 · Tu plataforma»). On macOS the command already carries the platform; on Windows it asks for it, with «cloudframework» as the default value, which you must replace with yours. Then it asks for your email and confirms which platform, email and folder it will work with.
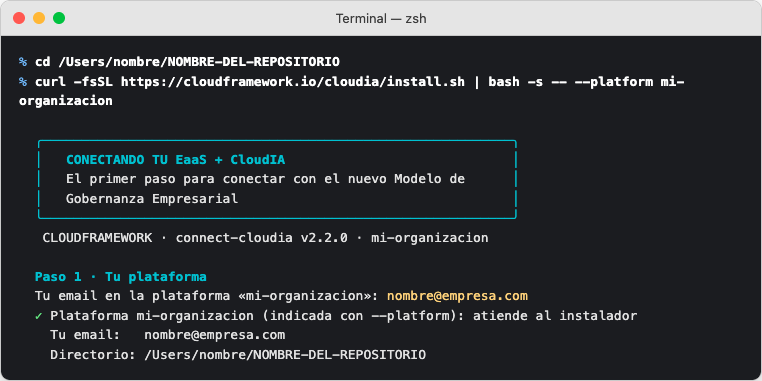
Identity check. It asks for the six-digit code. It never asks for your password. You have three attempts and the code changes every 30 seconds, so type it right when it is asked for.
Your token («Paso 2 · Tu token»). Choose one from the list or create a new one with the letter N. When you create it you choose its expiry: 90 days by default. The token is only saved in files git ignores, so it never ends up in the repository.
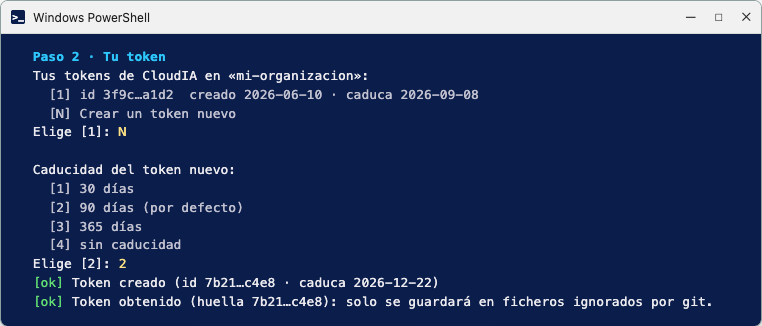
When you have it, go on to point 4: Check that it finished well.
4. Check that it finished well
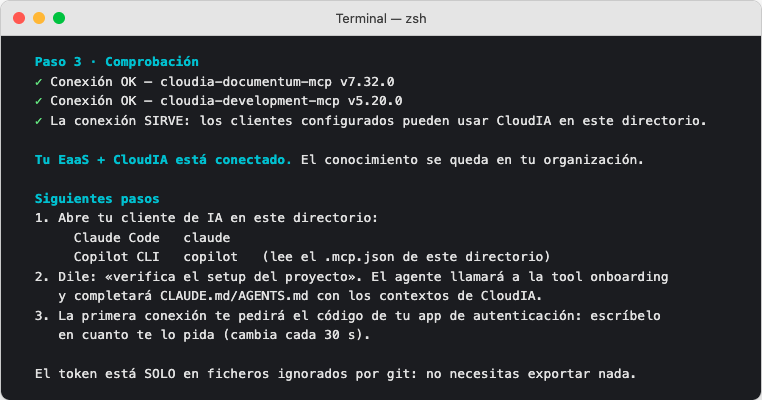
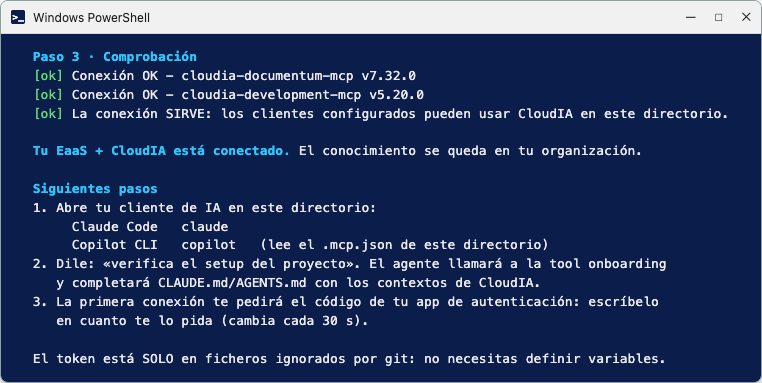
Section titled “4. Check that it finished well”At the end, the installer checks the connection. It went well if it says «Tu EaaS + CloudIA está conectado» (your EaaS + CloudIA is connected), followed by «Siguientes pasos» (next steps).
What the final screen looks like
If it tells you that .mcp.json is tracked in git
If at the end it says «Commit PENDIENTE: .gitignore»
The installer has added to .gitignore the files where your CloudIA token is saved, so that they are never uploaded to the repository. It is a safeguard: normally the repository would already include them. The installer never makes commits, so that change is left pending. Confirm it yourself with these two commands, or pass it to the person in charge of the repository so they include it:
git add .gitignoregit commit -m "Ignora los ficheros con el token de CloudIA"When you have it, go on to point 5: Start working.
5. Start working
Section titled “5. Start working”Open your AI assistant inside your working folder:
| If you use… | Do this |
|---|---|
| Claude Desktop | Open the Code version of the application. Click New and select your working folder: it will stay on the left as a project. Always create and work on your sessions from that project, so CloudIA works in your folder. |
| Claude Code | In a terminal, go into your working folder with cd and type claude. |
| GitHub Copilot app | Open a project, choose Open folder and select your working folder: it will stay as a project. If the app asks whether you trust the repository, click Trust repository: otherwise it will not load CloudIA’s connectors. Always create and work on your sessions from that project, and set up each session like this: (a) choose where the session works: depending on the app version you will see it as «Where to run this session» → Local repository or as «Where to work» → Current checkout; choose that one and do not use New worktree or Cloud, because the session would work on a separate copy of the repository or remotely and could not read the configuration of CloudIA’s connectors, which only lives in your folder; (b) choose a capable model, one of the most advanced in the list; (c) in Context window, choose 1M. |
| Copilot CLI | In a terminal, go into your working folder with cd and type copilot. |
-
Write this as your first message:
2fa <authenticator app code>, putting in place of<authenticator app code>the 6-digit code your authenticator app shows at that moment. Without this verification CloudIA cannot do anything: its connectors require it before any query. The code changes every 30 seconds; if it expires, type the new one. It is the only time it is typed in the conversation, and that is correct. -
Then check that the installation works by pasting this message. It will answer with your user, your platform and what each connector returns:
Check that CloudIA works: tell me which user and platform I am connected with, list the CloudIA connectors you have loaded and run a read query on each one, showing me what it returns. If any of them fails, tell me which one and the error. Do not review the repository or propose changes.If a connector fails, it will tell you which one and with what error: pass that message to the person in charge of CloudIA in your organisation. A connector can fail even when the installation is fine, so there is no need to repeat it.
-
From then on, ask it for whatever you need, as you would a colleague: what tasks you have, what is pending in a project or help with a document.
Done: CloudIA is now installed.
Your tokens
Section titled “Your tokens”The tokens you have used or created with the installer are yours and are linked to your user on the platform. On the platform, in the CloudIA module, section Mi dashboard → Conectar CloudIA, you can see the active ones, create others, retrieve one to install it on another computer and revoke the ones you no longer use. If you lose a computer or suspect a token has leaked, revoke it there and run the installer again: it will offer to create a new one.